Although creating a wired Ethernet network isn’t expensive it is time consuming, involves basic DIY abilities, and making a mess.
It is because of this that it is best done when you have a completely new build or a major refurbishment.
There are many ways of extended your current network without drilling holes in walls and running Ethernet cables.
However for those of you who are thinking of having it done ,or doing it yourself then I have put together these research notes that may help.
The first and most important part is creating a plan. You will need to consider:
Next you need to make a list of what you will need.
Cable – For home networks cat 6 is probably the best choice today. CAT 7 (latest version) is shielded which adds complications to the installation.
Solid vs stranded cable – For backbone cabling use solid.
RJ45 Connectors -Terminates the cable and plugs into a computer/switch/socket.
Wall-socket –Terminates the cable in a room and accepts RJ45 Connectors.
Wall face plates– These Cover wall sockets.
Keystone jacks These are female connectors that are usually mounted into a wall plate or patch panel.They are part of a wall socket,
Keystone plug is the matching male connector, usually attached to the end of a cable or cord.
Mixing Cat5 cables, jacks and Cat 6 cables and Keystone Jacks. – The general consensus it that it should work, but try not to do it. For example: Cat6 cable has a thicker copper wire and insulation and the cat6 jacks are made to take this into consideration.
Old type wall sockets and patch panels had the wiring connections as part of the socket/panel whereas newer ones tend to have holes that accept keystone jacks. If you watch a couple of the videos you will see these two types.
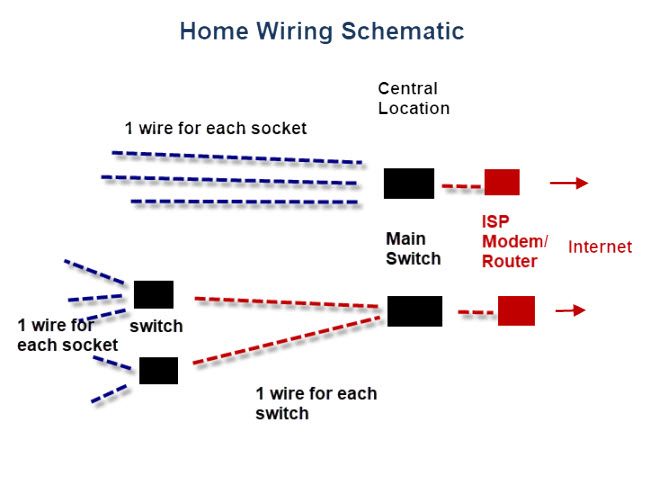
There are two main options as shown in the schematic above.
You can bring the cables from all wall sockets to a central location. This is the option shown in most home wiring videos on Youtube.
The other option is to use several switches perhaps one per floor and wire those switches back to a central location.
This results in a potentially slower network, but it is the option chosen when cable routing isn’t inside the wall.
This is where all of the cables from each of the room sockets come together, and plug into a switch.
You have two option for the cable ends:
Using a patch panel gives you more flexibility, but is probably an overkill in a small network.
Do you Need a Patch Panel?
The central location will most probably contain your ISP Router (Cable modem), but doesn’t have to.
Notes:
Label cables at the end in the central location as you need to know what room and socket they connect to.
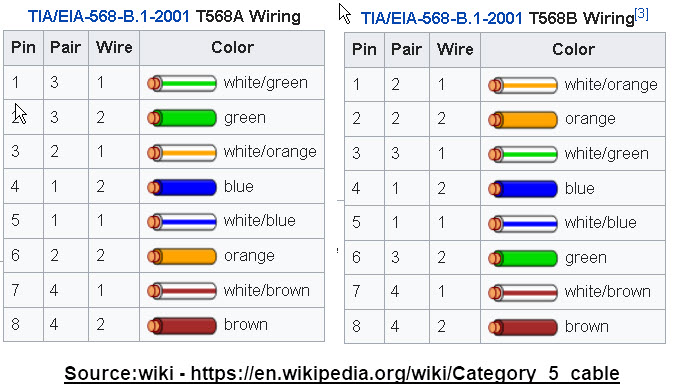
This is what cable colour is wired to what pin on the connectors.
There are two wiring standards in use ( 568A or 568B). You should choose one and use it consistently everywhere.
568A is more common in Europe and Pacific countries
568B is more common in USA.